
Welcome back to the second devlog for my top-down car chase game (Overdrive Escape, working title). In this post, I’m diving deep into the car physics system—how I’m handling acceleration, suspension, tire grip, drifting, and more.
This system is what makes the car feel fun to drive—responsive, drifty, but still controllable—and it’s been a major focus during early development.
Core Concept
In Unity, there are a few common approaches to vehicle physics:
- Using built-in Wheel Colliders
- Or, building a custom system with Rigidbody, raycasts, and manual forces
I chose the second option. Using a custom system gives me more control, especially for a top-down arcade-style game. It also allows me to easily tweak behavior like grip, drift, and boost effects to create a more satisfying feel.
Car Setup
Each wheel is a separate GameObject controlled by a script called CarWheels.cs.
The car body itself has a Rigidbody, and each wheel handles things like suspension, acceleration, steering forces, and visuals.
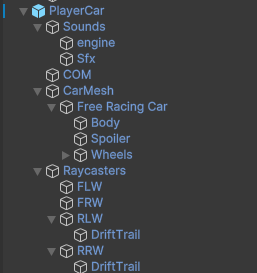
Suspension System with Raycasting
Instead of Unity’s WheelColliders, I simulate suspension by casting a ray downward from each wheel’s position.
isGrounded = Physics.Raycast(transform.position, -transform.up, out RaycastHit hit, raydistance);
If the ray hits the ground, I calculate how much the suspension is compressed and apply a vertical spring force:
float offset = raydistance - hit.distance;
float velocityY = Vector3.Dot(springDir, tireVelocity);
float force = (offset * springStrength) - (velocityY * dampingStrength);
carRigidbody.AddForceAtPosition(transform.up * force * carRigidbody.mass, transform.position);
This gives a dynamic suspension bounce that helps the car feel connected to the surface. When the wheel isn’t grounded, I also move the wheel mesh downward for visual feedback.
Acceleration and Speed Limiting
When accelerating, the script applies a forward force at the wheel’s position:
Vector3 force = transform.forward * carAcceleration * 10 * accelerateValue;
carRigidbody.AddForceAtPosition(force, transform.position);
When no input is given, I apply deceleration to simulate rolling resistance or drag:
Vector3 deceleration = -carRigidbody.linearVelocity.normalized * decelerationRate;
carRigidbody.AddForce(deceleration, ForceMode.Acceleration);
To prevent the car from going unrealistically fast, I also clamp the velocity:
if (carRigidbody.linearVelocity.magnitude > topSpeed && !isBoosting)
{
    carRigidbody.linearVelocity = Vector3.Lerp(
        carRigidbody.linearVelocity,
        carRigidbody.linearVelocity.normalized * topSpeed,
        Time.fixedDeltaTime * 0.5f
    );
}
Steering and Grip Logic
Steering is applied differently depending on whether the car is grounded and which wheel is steering (front or rear).
Each wheel calculates lateral (sideways) velocity and applies a grip force to counteract it.
float tireVelocityX = Vector3.Dot(steerDirection, tireVelocity);
float velocityChange = -tireVelocityX * tireGripFactor;
Vector3 force = steerDirection * wheelMass * (velocityChange / Time.fixedDeltaTime);
carRigidbody.AddForceAtPosition(force, transform.position);
This gives a sense of real-world tire friction without using any built-in physics components.
Tire Grip with AnimationCurve
One of the most flexible parts of this system is the tire grip system, which uses a Unity AnimationCurve.
This lets me control tire grip based on speed.
Here’s how it works:
return carController.car.TireGripFactor.Evaluate(normalizedVelocity);
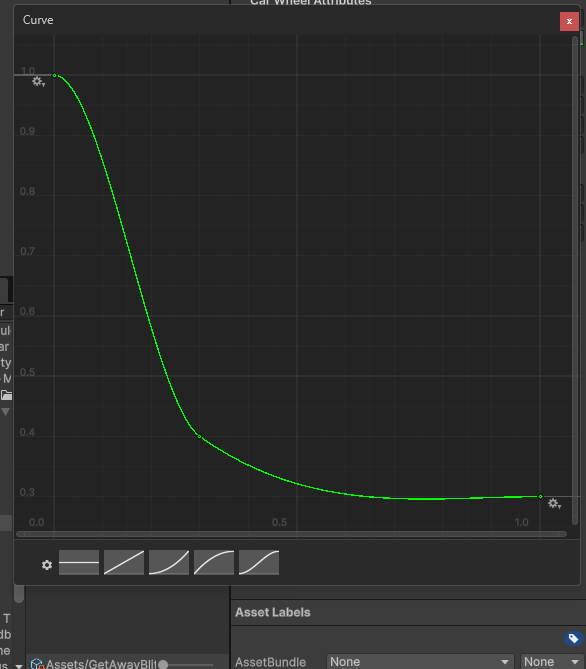
This curve lets me define how grip falls off as the car speeds up. For example:
- At low speeds, the car has high grip for tight turning.
- At high speeds, grip is reduced to make the car more prone to sliding or drifting.
Drift Mode
If the player is drifting (either by input or gameplay mechanic), I override the normal grip behavior.
if (isDrifting && normalizedVelocity > 0.7f)
{
    currentSteerAngle *= 1.5f;
    return wheelType == Front ? 0.1f : 0.05f;
}
This greatly reduces lateral grip and increases the turning angle to allow exaggerated drift effects.
The wheel also triggers a trail renderer for visual feedback.
if (driftTrail != null)
    driftTrail.emitting = true;
Boost System
The car has a boost feature which temporarily adds extra acceleration and raises the top speed:
Vector3 boostForce = transform.forward * acceleration * boostAccelerationFactor;
carRigidbody.AddForceAtPosition(boostForce, transform.position);
And clamps velocity to a new maximum:
if (velocity.magnitude > topSpeed + boostTopSpeed)
{
    velocity = velocity.normalized * (topSpeed + boostTopSpeed);
}
Wheel Rotation (Visual Feedback)
Finally, for realism and polish, I rotate the wheel mesh based on the distance it’s moved:
float rotationAngle = direction * (distanceTravelled / (2 * Mathf.PI * wheelRadius)) * 360f;
wheelMesh.GetChild(0).Rotate(Vector3.right, rotationAngle);
This small touch helps convey speed and traction visually.
What’s Next?
Here are a few upcoming systems I’ll be working on:
- AI cars that chase or dodge the player
- Basic traffic behavior and obstacles
- Destructible props (barriers, cones, breakable signs)
- A playable city layout with ramps and tunnels
Conclusion
That’s a detailed breakdown of the current car physics system. It’s all custom-built using Rigidbody, raycasts, and force application to create a responsive driving feel—ideal for a top-down chase game.
The system is modular and tweakable, and I’ll keep refining it as gameplay mechanics evolve.
Let me know if you’d like a simplified Unity package or want parts of this system explained further in a future post.
Follow the Devlog
I’ll be sharing more updates like this as the game develops—including AI logic, visual effects, UI design, and level building. Stay tuned for the next devlog!